Documentation: The new framework explained
Documentation: The new framework explained
The new documentation module aims to be a good companion for users, developers, documentation writers and translators. So let's take a look at different aspects of the framework.
How it looks
First of all, I'm going to show you how the documentation looks inside Koo and what is possible with it. As I already mentioned, we hope Web and GTK clients will join the effort, so what we already have in Koo should be available in those clients too.
Let's start with the simple part. We have created three submenu options inside Help/Documentation.
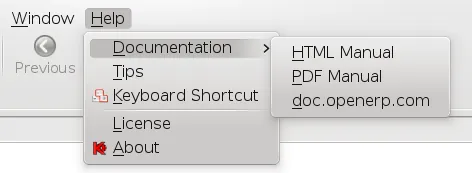
The first one will open the documentation in a new tab in the application:
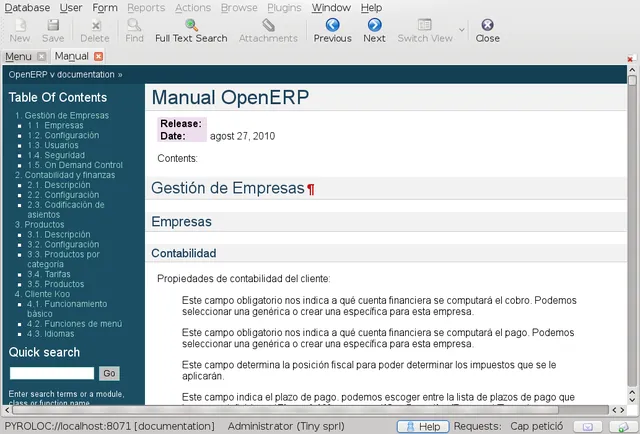
The second one will open the documentation in a PDF file that can later be printed. The content in both cases is exactly the same.
The last entry will open doc.openerp.com in a new tab in the application. Press the Control key if you want it to be opened in your system's default browser.
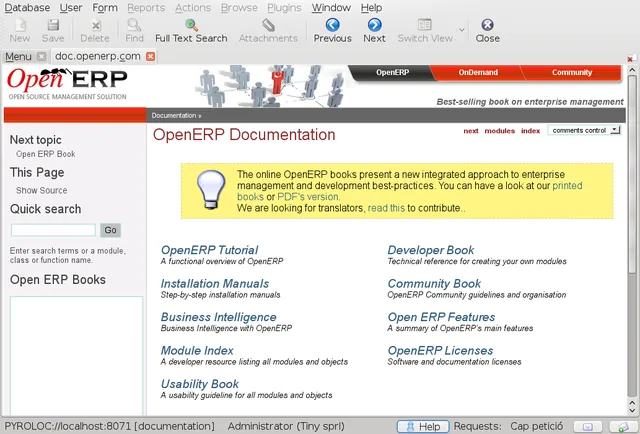
As you can see, in the first and last options, the previous and next buttons—as well as reload—of the standard interface are used as the usual browser buttons. In fact, URL actions are now opened inside Koo by default, except if the user presses the Control key as already mentioned.
Note: Although documentation will usually be HTML, you do not need to open any new ports in OpenERP because Koo will use your favorite protocol—XML-RPC, Net-RPC or Pyro—for loading HTML and images through a new internal protocol:
openerp://.
Even if what we have seen in the first option is what all of us are used to when opening a manual, it is hardly useful. If we wanted to read the whole manual, we could print its PDF version, but that's it. Indeed, most usually we would find ourselves searching for information in it, such as a field or a menu entry.
With the new framework, users will almost always open the manual using the new contextual interface. The idea is that users can view the parts of the manual that refer to the work they are doing at that moment.
This has the advantage that documentation writers will write a single book, with information structured as a book, which can be read from beginning to end. At the same time, the documentation is ensured to remain useful because users will be directed to the sections they need when they need them.
The contextual interface is currently available in a couple of places.
The first place users will notice is the new Help button added to the status bar. This will provide help for menu entries:
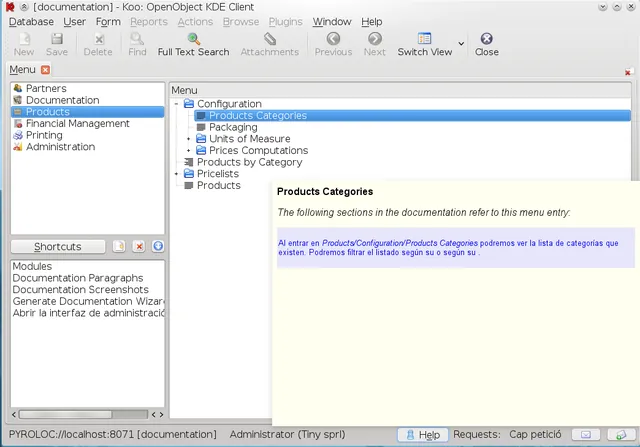
Here, users can see the paragraphs in the documentation where the menu is referenced.
It also provides help for views:
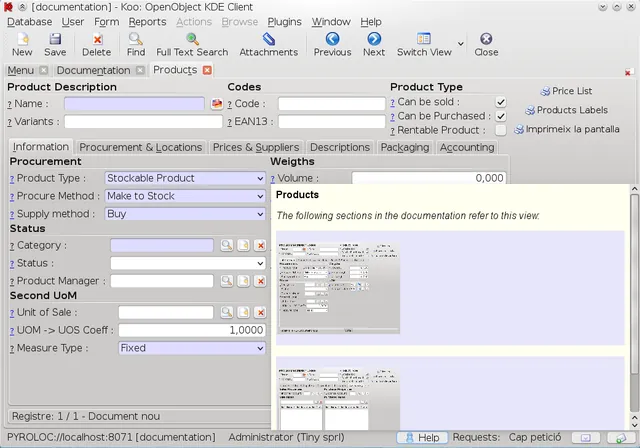
Here, users can see the places that contain screenshots of the view. In both cases, users can click and see the appropriate section in the documentation:
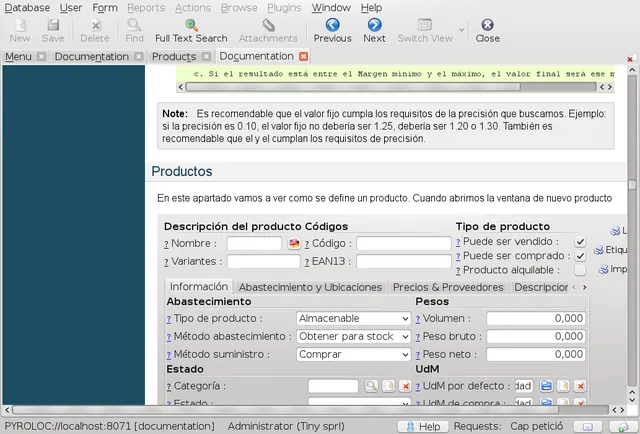
The second place in which we have added contextual information is in fields.
Until now, only fields with a tip had a question mark. We have now added the question mark to all fields. Those with a tip are shown in blue and those without one are shown in black.
Clicking on the question mark displays not only the tip, but also all the places in the documentation where the field is mentioned:
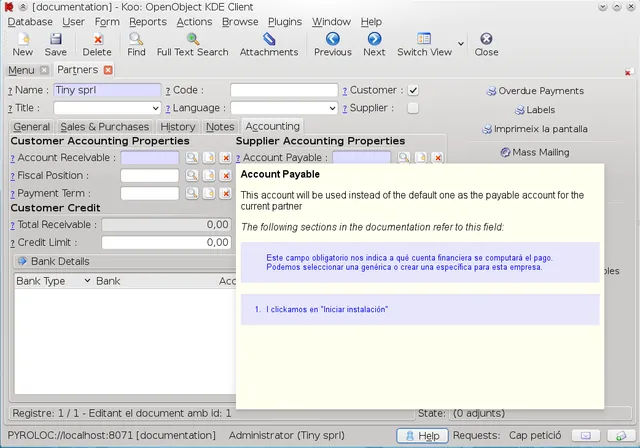
That's all we have implemented for now.
One other feature we would like to introduce is the ability to view the places where the current state of the workflow of the current document is mentioned. This would allow users to fully understand what open invoice means, for example.
Although this is all user-oriented, we also think the framework should be used to include developer information. Integrators could also add all notes and documentation generated during the integration process for a given customer.
The documentation will only show information relevant to the modules that are currently installed. Screenshots will also reflect what the user can actually see.
For example, if the user belongs to a group that cannot see certain fields, those fields will not appear in their screenshots, even if they appear for other users.
Writing it
Structure
Each new module may have—and hopefully we can make this a requirement—a doc directory. Documentation is written using Sphinx syntax plus some extensions, so Sphinx must be installed on the server.
This ensures that documentation remains close to the code and developers feel comfortable with it, while also being intelligible to documentation writers.
The doc directory is expected to contain one or more .rst files.
Alternatively, if the module provides documentation for other modules, it may have a modules subdirectory containing the documentation for each module it covers.
Don't worry if you need to read that sentence twice; it occurred to me and I wrote it ;-).
For example, as we at NaN have no commit access to the addons repository, we have created some documentation for the base, product and account modules.
If the module is called addons_doc, the directory will look like this:
text
addons_doc/doc/
addons_doc/doc/modules/
addons_doc/doc/modules/base/
addons_doc/doc/modules/product/
addons_doc/doc/modules/account/
If a module provides documentation for other modules and therefore has a doc/modules/ directory, any other file directly inside doc/ will be ignored.
If we wanted to provide documentation for the addons_doc module itself, we would add a new directory for it inside addons_doc/doc/modules.
I mentioned that the syntax of these files is Sphinx plus some extensions. There are two kinds of extension tags:
- Replacements
- Identifiers
Replacements
Replacements allow some information in the documentation to be filled in using content from the database the user is running.
Currently, the following three replacement types are implemented.
Fields
Use the following syntax:
text
/// f: res.partner.name ///
It will replace the tag with the label of the field—Name in this example, when the output language is English.
The field reference is composed of the model and field name, separated by a dot.
You can also print the help text of the field using the following syntax:
text
/// f: res.partner.name : help ///
In both cases, the system will create an anchor immediately before the current paragraph, allowing it to find this occurrence of the field in the generated HTML.
Menus
Use the following syntax:
text
/// m: base.menu_ir_sequence_form ///
It will replace the tag with the complete name of the menu:
text
Administration/Configuration/Sequence/Sequence
The menu reference uses the model-data syntax that most developers are accustomed to using in view XML files.
This value is easy to obtain in Koo:
- Select the menu entry.
- Click Switch View.
- Click Plugins/Search Model Data in the top menu.
The system will also create an anchor immediately before the current paragraph.
In the future, we will make it possible to open the menu entry directly from the documentation itself.
Views
Use the following syntax:
text
/// v: base.sequence_view ///
It will replace the tag with a screenshot of the view. In this case, it would generate the following image:
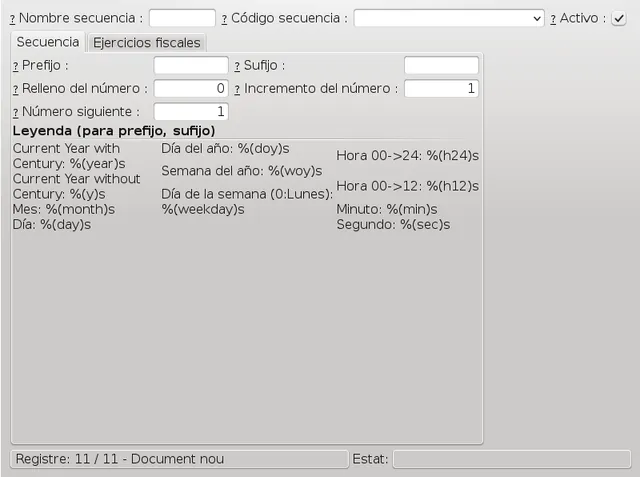
As with menus, the reference follows the model-data syntax.
You can also add a modifier:
text
/// v: base.sequence_view : fiscal_ids ///
When the system generates the screenshot, it will ensure that the fiscal_ids field is shown, even if it is not in the first tab.
In this example, the generated image would look like this:
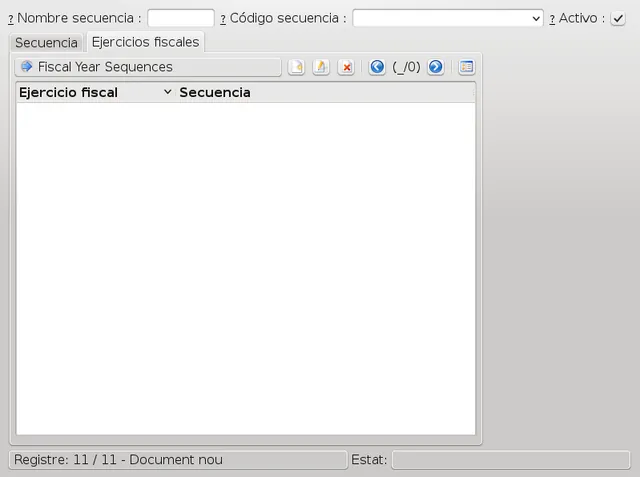
This is useful because we do not know how many tabs there will be when the documentation is rendered. The field being discussed may also have been moved elsewhere.
This feature does not prevent documentation writers from adding other screenshots or images. They should add them in the same way they normally would with Sphinx, and they will be rendered correctly.
The system will also ensure that filenames do not collide, so users do not need to worry about that.
Example
With these explanations, we can already understand a simple example that could serve as part of the documentation for the base module.
The index.rst file:
```rst OpenERP Manual ==============
Contents:
.. toctree:: :maxdepth: 2 :numbered:
base.rst ```
As you can see, index.rst tells Sphinx to load the base.rst file, which could look like this:
```rst Configuration =============
Sequences
In /// m: base.menu_ir_sequence_form /// you can manage sequences which allow advanced users to determine how document numbers will be generated.
/// v: base.sequence_view /// ```
Identifiers
Identifiers follow this syntax:
```text ||| identifier_name_that_I_want |||
Here starts the paragraph we want to assign this identifier to. ```
They should appear at the beginning of a paragraph. The paragraph itself should start on the next line or the next non-empty line.
Identifier tags allow each paragraph to be assigned an ID, similar to what developers do with views, although identifiers are not required.
If documentation writers do not provide an identifier for a paragraph, the system will create one automatically.
To create it, the system will use the first words of the paragraph and add a number if necessary to ensure that the ID is unique within its module.
Identifiers can also follow this syntax:
```text ||| : after : base.base_rst |||
product.rst ```
In this case, the identifier for the paragraph will be created automatically.
Alternatively, you can provide an identifier explicitly:
```text ||| add_product_rst : after : base.base_rst |||
product.rst ```
In both cases, we are telling the system to add the paragraph—which in this case simply contains product.rst—immediately after the paragraph with the identifier base.base_rst.
This means the paragraph with the ID base_rst in the base module.
Looking at the previous example, you will notice that we are adding a new product.rst file to the index.rst file created by the base module. As you may have guessed, this documentation would form part of the product module.
The placement section of the identifier tag can currently use any of the following values:
beforeafterprependappendreplace
The before and after options create new paragraphs and therefore add an empty line between the new paragraph and the inherited one.
The prepend and append options do not create new paragraphs.
This inheritance mechanism provides great flexibility and helps avoid the conditional if problem mentioned in my previous blog post.
However, because paragraphs are used as references, documentation writers should take this into account when structuring content.
For example, in Sphinx, a definition list can be written like this:
rst
word1
 explanation 1
word2
 explanation 2
Or like this:
```rst word1 explanation 1
word2 explanation 2 ```
Both versions are valid in Sphinx and in this framework.
However, the second provides more flexibility if someone creates a new module and needs to add a new entry between word1 and word2.
Automatically created identifiers may change over time if they are not set manually, because the first words of a paragraph may be edited.
For this reason, we plan to allow the system to store automatically generated IDs in the original .rst files.
This will allow documentation writers to freely correct typographical errors or restructure sentences without breaking documentation belonging to dependent modules. It will also remove the need to manually create a unique ID for each paragraph.
Apart from knowing a little Sphinx, this is all you need to know to write documentation for this framework.
How it works
In the previous section, we explained that documentation will live inside the modules, very close to the source code.
Here, we will explain what the system does and the steps required to import and render the documentation.
After installing the documentation module in OpenERP, a new Documentation entry will appear in the main menu.
The first thing you should do is execute the Import Documentation Wizard.
This wizard checks the doc/ directory of every module and imports the .rst files into the OpenERP database paragraph by paragraph.
As mentioned above, the system considers that a paragraph ends and a new one begins after every empty line.
Once the paragraphs have been imported, you can view them in the Documentation Paragraphs menu entry.
You should then:
- Open Documentation Paragraphs.
- Select all paragraphs.
- Execute the Plugins/Create Screenshots action in the menu above.
No need to explain what this action does, I guess.
Finally, execute the Generate Documentation Wizard. The documentation will then be ready to use.
Translating it
The import wizard will add a record to ir.data.model for every paragraph.
This means that when you create a .pot translation-template file for a module, the documentation will also be exported.
Easy.
The translation process is also simplified because the original writer has already used tags to refer to menus and fields.
As a result, translators do not have to determine the exact names assigned to these elements in their language.
The same applies to screenshots, as they will be generated automatically in the user's language for each installation.
The future
We have already mentioned some of the improvements we would like to make, such as references to workflows and their activities or the ability to open menu entries from within the documentation itself.
Other ideas include:
- Avoid forcing users to open the Paragraphs section and select all paragraphs before creating screenshots.
- Regenerate documentation whenever needed without the user noticing or requesting it.
- Integrate documentation importing with module installation so that a separate import process is unnecessary.
- Allow users to add their own notes inside the documentation, as they tend to use their own terminology and follow their own processes.
- Add an appendix containing technical information about the modules installed in the system.
